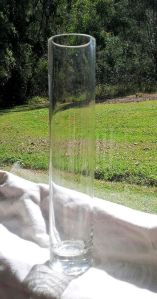
 I was looking round a local shop the other day and found a couple of long thin glass vases which looked perfect for a felting project.
I like the tall, slender shape – 24 x 5cm – and the vase is made with glass thick enough not to break during the felting process.
This is the first attempt at covering a glass vase, so I was careful to work out the correct size for the resist, allowing for shrinkage. After measuring the height, depth and width of the vase, adding height and depth, and width and depth, then multiplying by 1.2, gave me a resist that was 12 x 34.8cm which I rounded up to 35cm.
So, which colours to choose?
I had a vision of natural cream at the top, with a stronger colour for the base and I wanted to add a pattern. For the pattern I chose some multicoloured yarn in oranges and green shades, and selected orange for the base colour.
Process
The first phase included laying out the yarn on the resist, as I chose to make the vase inside out. I cut different lengths and arranged them on the resist hoping they would be so evenly spread out at the end, that it would be difficult to tell this was made on a flat resist. I then sprinkled a few wisps of mulberry silk tops to give added interest.
I layered three layers of merino wool at right angles to each other, wetted it with soapy water, rubbed through a small piece of net curtain that I laid on top of it and when it held together fairly well, I removed the net and flipped the whole thing. First of all I turned in the overhanging tops that I had laid about 2cm over the edges. This would create part of the invisible seam of the finished vase.
The flip side was a repeat of the first.
Turning over again, I repeated the process two more times with two more layers of rovings finely laid at right angles, but without needing to overlap these.
On the final layer I added a variegated orange/brown tops mix instead of orange so if anyone wants to peer down to the bottom of the vase, they can see ‘matching’ inside.
Rubbed, rolled, rubbed and rolled.
Cut off the top edge and removed resist.
Heated, threw, heated, mashed.
Began shaping, first over the end of a pool noodle, then as it shrank, over the actual vase.
Eventually it shrank to a size I was very happy with and fitted nice and snugly over the glass.
Rinse, second rinse in water with splash of vinegar. Spin dry. Reshape over vase.
Photograph.
Remove glass and hang out on the line to dry.
Finished vase
For a first at a covered vase, I am very happy with the effect.
What next?
Now I’m toying with making a similar felt covering only using blues and aquas to match a similar thread in a different colour range.
But perhaps I could stretch my creative boundaries and make a vase covering that allows more of the glass itself to show through.
More on that next time.


Written
on 26 September, 2013