… is all that matters here!

Posts tagged ‘wet felt’

Felt making and Arts Trail

This weekend has been very eventful!

Arts Trail – Open Studio

The Glasshouse Country Arts Trail has an open studio few days coinciding with school holidays – from Saturday just gone until Wednesday.

As last time I was fortunate enough to be able to share Sandra Price’s studio which is in her home on the main tourist route from Glasshouse Township to Beerwah.  It was a very pleasant weekend and we actually spent Saturday making conversation more than making art as it has been such a long time since we saw each other.  But it was very rewarding as conversation flowed with cups of tea and a tad too much chocolate…

I managed to complete my rose as a brooch by stitching the clasp onto the back, so it is now more than a pretty felt flower, but can be worn as well.

Sunday was more productive for both of us. Sandra worked on her elephant painting which was a development fascinating to watch as she brought beautiful Mma Tembo to life using a monchrome palette.  I am eager to see it finished.

While Sandy painted, I felted.  Because I was feeling quite tired this weekend, I couldn’t face a large project that would require lots of physical work, so I made two smaller pieces.

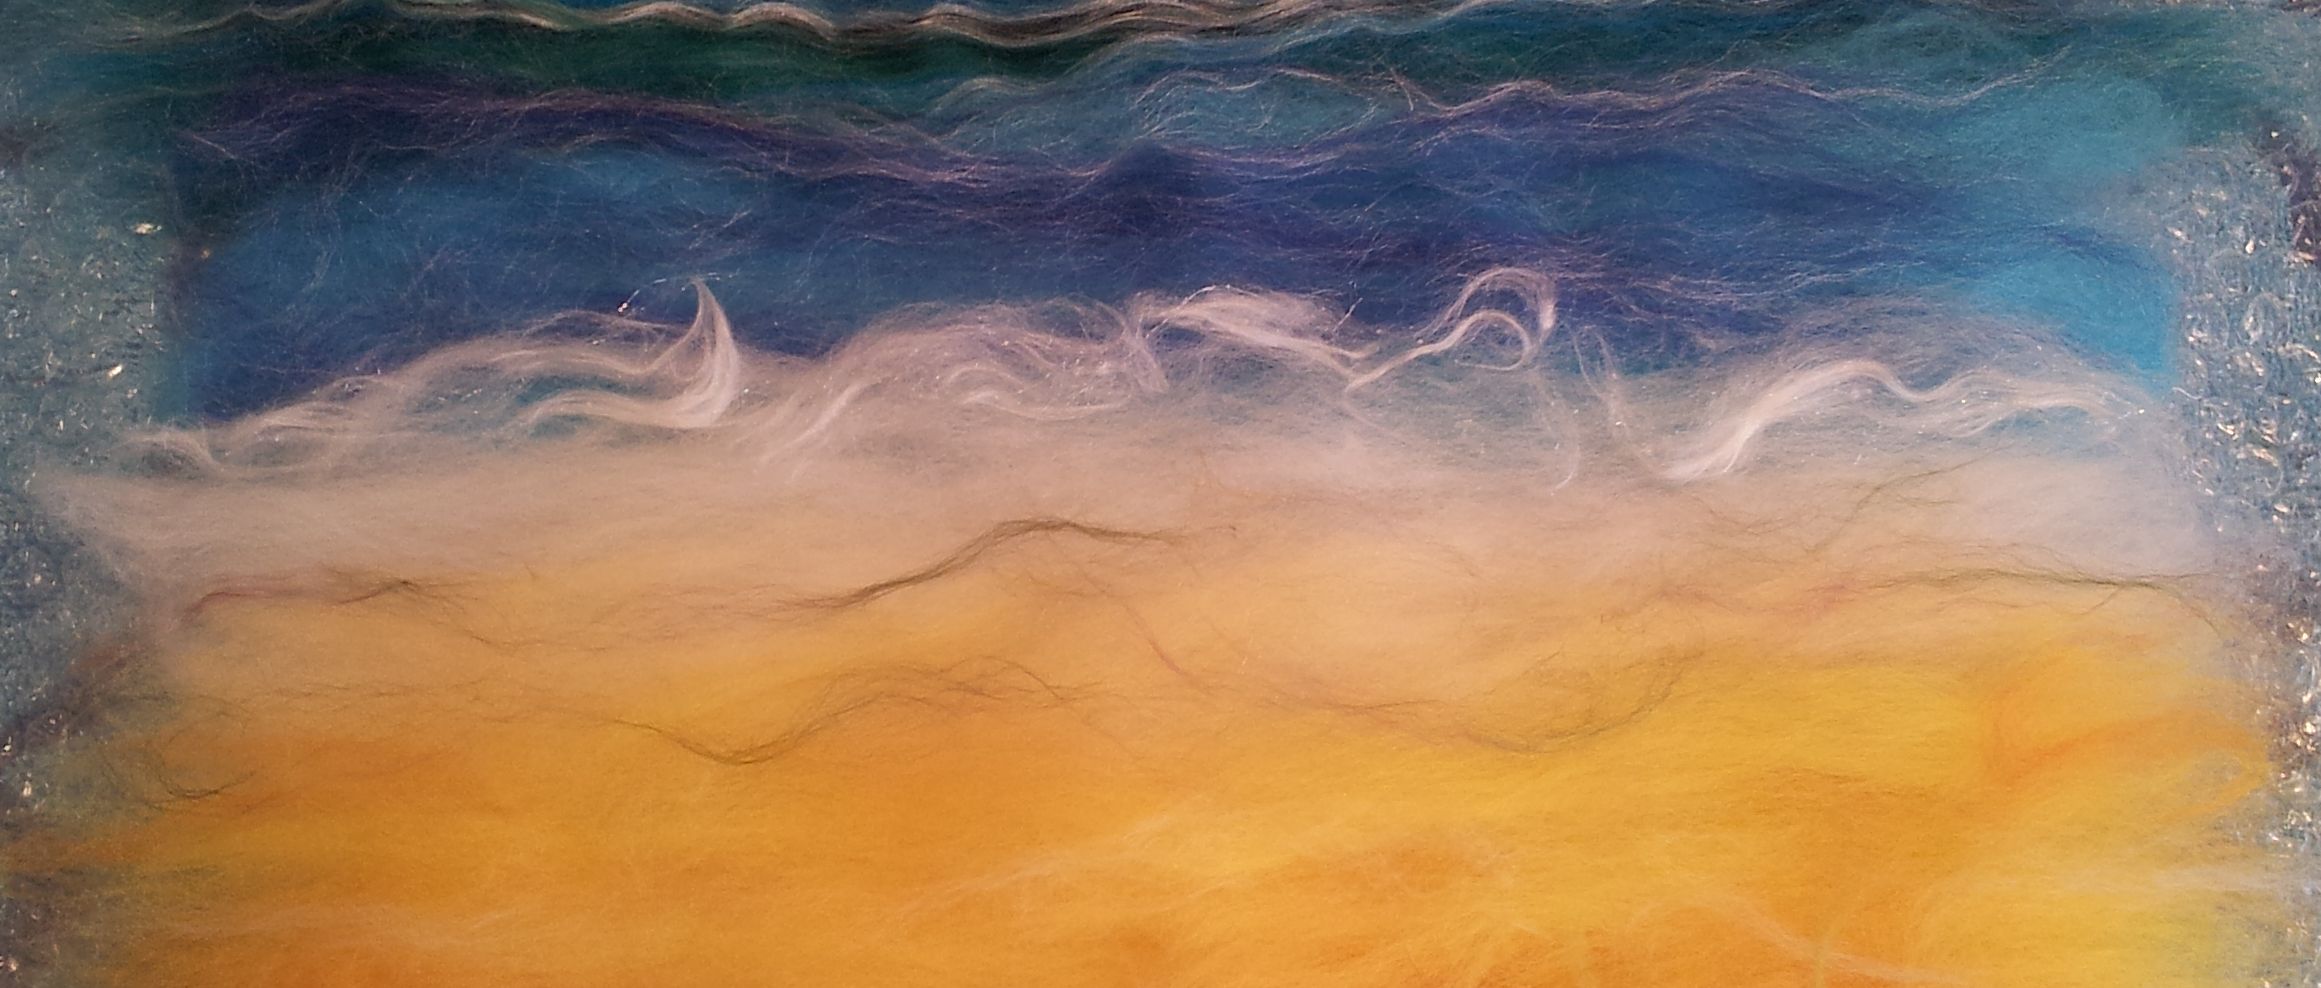
Miniature country scene

The first was a little country scene that I was going to use as an insert for one of those pre-made cards that has a frame cut into the front so you can put a painting behind.  I went a bit made with the wool layout though and the whole painting turned out too large for the card.  As luck would have it, Sandy happened to have the perfectly sized embroidery hoop which she suggested as a frame, so I attached the ‘painting’ to some cotton fabric and stretched it into the hoop.  Some of the corners sit just over the edge of the hoop but I rather like the effect.

Country scene 'round' felt painting 15cm

Country scene ’round’ felt painting 15cm

I’m actually pleasantly surprised at how this turned out.  Sandra really liked it too.  I will definitely make more of these.

Blue glass vase cover

The other smallish project I gave myself was covering the second of two tall slender glass vases I bought the other day.  If you read my recent post, you’ll have seen the first one which I covered in cream/orange.

This time I wanted to experiment with a completely different look.  I went for a covering in totally different colours, and laid in such a way that a lot of the glass would show through.

Colour palette of merino wool

Colour palette of merino wool

I chose dark blue, turquoise, lime green and cream as my palette.

I also used blobs of silk noile for details, and some ever gorgeous and lustrous silk tops.

Blue vase silk used

Silk noile and tops


The resist for this pattern was the same as for the last vase, as I knew it would give me a perfect fit.

I’ve never made anything 3D that is open weave before, so this was guess work, but I’ve got a couple of pics of the layout front and back, that I’ll show you.

As you can see, I’ve arranged the wool in such a way that it snakes up the vase.  I had no idea if this would work, or if it would end up all crumpled down the bottom of the vase like some old woman’s stocking, but I couldn’t resist giving it a go!

Here are the layouts, front and back:

Blue vase layout - front

Blue vase layout – front

Blue vase layout - back

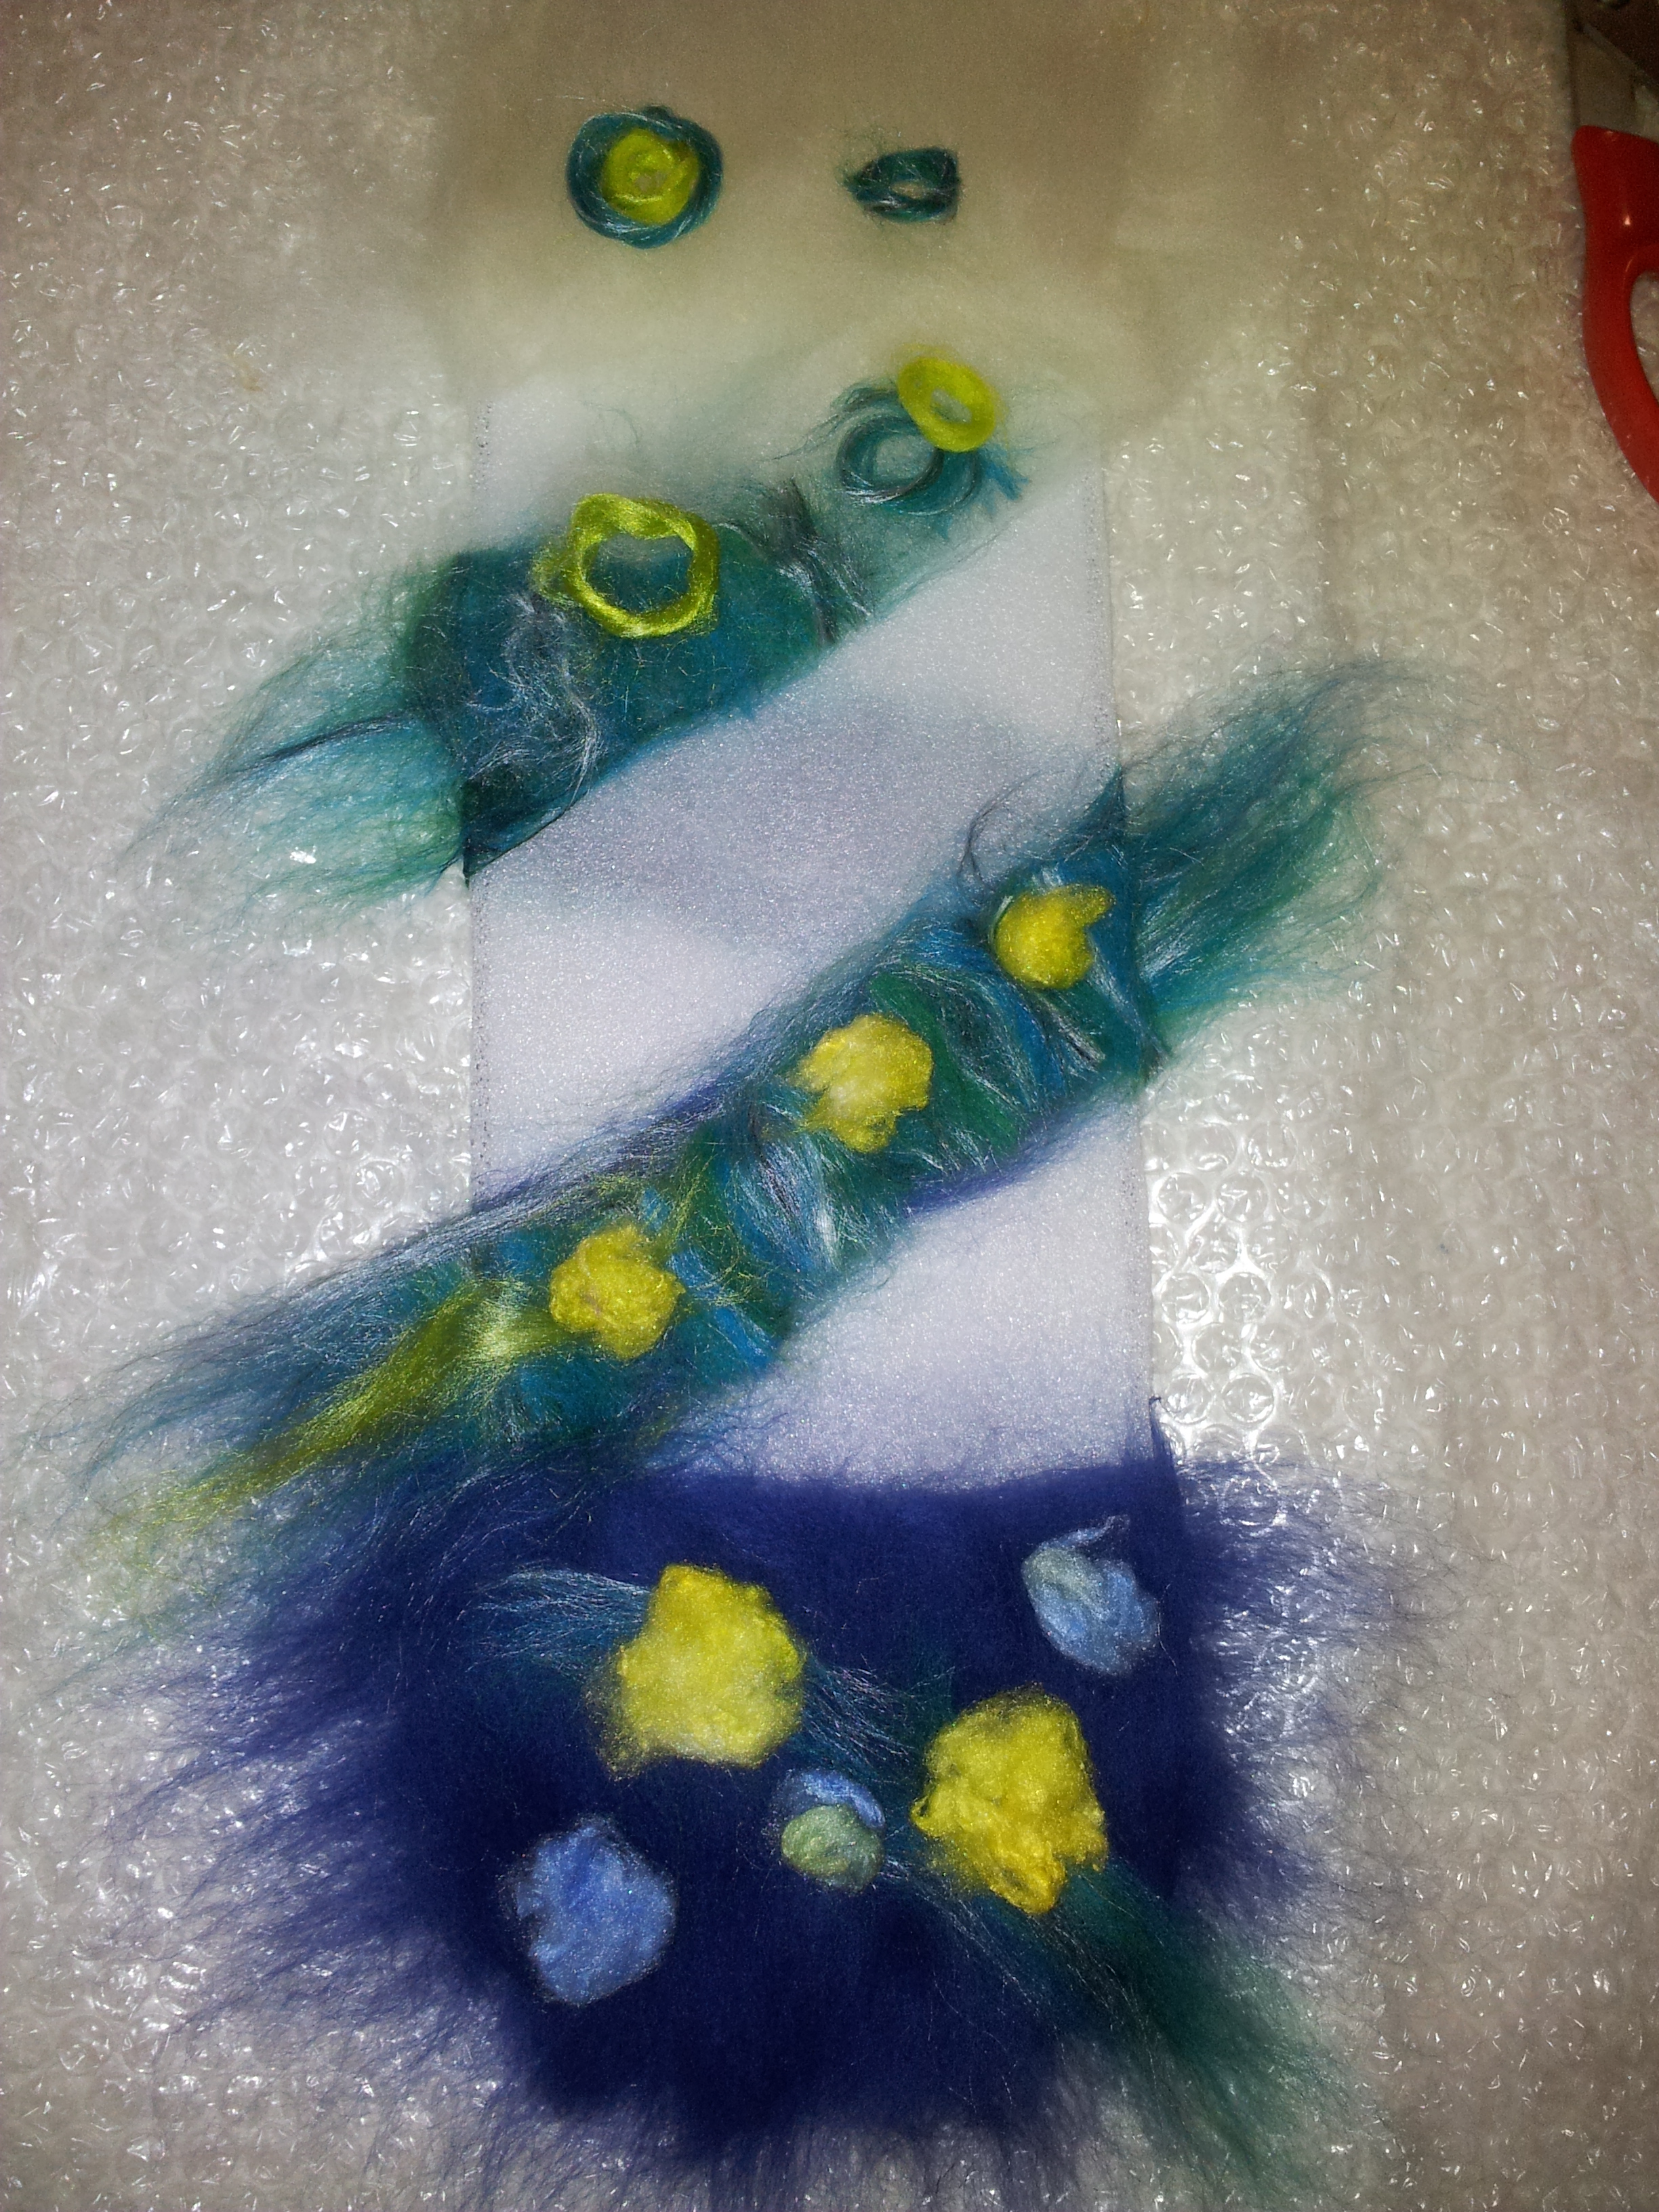
Blue vase layout – back

As you can see, I made the base fairly solid, and also had a rim at the top, with the rest of the wool winding around the resist.  I varied the pattern using silk noile and silk tops.

As it wasn’t a large piece, it didn’t take a lot of work, but I was glad that it shrank to a size that it perfectly fits the vase.

Here is the finished result:


So while I made only two small pieces over the weekend, both were new territory for me, and it’s always good to stretch your creative boundaries!


Aside

Arts Trail and Library Exhibits!

I’m a bit excited and also a bit spread out in Beerwah this week!

The latest Glasshouse Country Arts Trail is on to coincide with the school holidays and I am exhibiting with fellow Arts Trail member, Sandra Price at her studio this weekend until Wednesday.

At the same time, I am displaying some of my felt at the local library for a couple of weeks in the glass cabinets at the front of the library.  I will also have my Mt. Coonowrin wall hanging displayed there, as an example of the variety of uses of wet felting.

If you aren’t in the area but would like to visit the library, the address is:

Beerwah Library, 25 Peachester Road, Beerwah Qld 4519. Phone for opening hours: 1300 542 727

I must say, it’s heart warming to have these opportunities of sharing what I love with my local community.


Wet felt glass vase

Glass vaseI was looking round a local shop the other day and found a couple of long thin glass vases which looked perfect for a felting project.

I like the tall, slender shape – 24 x 5cm – and the vase is made with glass thick enough not to break during the felting process.

This is the first attempt at covering a glass vase, so I was careful to work out the correct size for the resist, allowing for shrinkage.  After measuring the height, depth and width of the vase, adding height and depth, and width and depth, then multiplying by 1.2, gave me a resist that was 12 x 34.8cm which I rounded up to 35cm.

So, which colours to choose?

I had a vision of natural cream at the top, with a stronger colour for the base and I wanted to add a pattern.  For the pattern I chose some multicoloured yarn in oranges and green shades, and selected orange for the base colour.

Process

The first phase included laying out the yarn on the resist, as I chose to make the vase inside out.  I cut different lengths and arranged them on the resist hoping they would be so evenly spread out at the end, that it would be difficult to tell this was made on  a flat resist. I then sprinkled a few wisps of mulberry silk tops to give added interest.

I layered three layers of merino wool at right angles to each other, wetted it with soapy water, rubbed through a small piece of net curtain that I laid on top of it and when it held together fairly well, I removed the net and flipped the whole thing. First of all I turned in the overhanging tops that I had laid about 2cm over the edges.  This would create part of the invisible seam of the finished vase.

The flip side was a repeat of the first.

Turning over again, I repeated the process two more times with two more layers of rovings finely laid at right angles, but without needing to overlap these.

On the final layer I added a variegated orange/brown tops mix instead of orange so if anyone wants to peer down to the bottom of the vase, they can see ‘matching’ inside.

Rubbed, rolled, rubbed and rolled.

Cut off the top edge and removed resist.

Heated, threw, heated, mashed.

Began shaping, first over the end of a pool noodle, then as it shrank, over the actual vase.

Eventually it shrank to a size I was very happy with and fitted nice and snugly over the glass.

Rinse, second rinse in water with splash of vinegar.  Spin dry.  Reshape over vase.

Photograph.

Remove glass and hang out on the line to dry.

Finished vase

For a first at a covered vase, I am very happy with the effect.

What next?

Now I’m toying with making a similar felt covering only using blues and aquas to match a similar thread in a different colour range.

But perhaps I could stretch my creative boundaries and make a vase covering that allows more of the glass itself to show through.

More on that next time.

Aside

Updated Felt Gallery

To view a lot of my felt work in one ‘hit’, check out the Gallery – Felt which I have just updated with more recent pieces.

New wall hanging – with bobbly bits!

I’ve been waiting for some wool nepps to arrive.

Wool nepps - 'bobbly bits'!

Wool nepps – ‘bobbly bits’!

Nepps are round, bobbly bits of wool that can be used in felting.  Gawd knows which part of the sheep they come from, but since I saw some on a website I’ve been itching to get my hands on some.

They arrived yesterday.

As I’d had a while to let my imagination run riot while I was waiting for Canadian and Australia Posts to talk to each other, I came upon a variation on a theme.  Another beach, only this time, instead of turning it into a realistic painting, I wanted to make it more impressionistic.

What was I going to do with my bobbly bits?

When I saw a photo of nepps, they reminded me of the smooth small pebbles I’d enjoyed sitting on when I was at Monaco another lifetime ago.

In the felt painting I envisaged, these little nepps would make great closeup grains of sand.

I’ve made this one a long, thin wall hanging 27 x 50 cm approximately.  It has lovely bright colours that flow from deep blue sky, to turquoise ocean, to yellow sandy beach, to white dunes with sand and some impressions of grass and rock/shell details.

Nepps layout

Nepps layout

The nepps were a little harder to felt than regular wool tops, but I persevered and most of them felted in.  I rather like the effect.

Ocean Sparkle

While I was ordering the nepps, I also ordered three little bags of different coloured Angelina Fibre.  This is great stuff and extremely reflective.  Less is more with this stuff unless you’re going for a disco look.

I added a few strands on top of the white silk tops that highlighted the waves rolling onto the beach. At different angles the light catches the fibre, and it looks like ocean spray sparkling in the sun.

Tiny threads of angelina fibre on top of the silk tops, to create 'ocean spray' effect.

Tiny threads of angelina fibre on top of the silk tops, to create ‘ocean spray’ effect.

The finished wall hanging

So, here it is, and I’m very happy with the result.  I like the longer thinner shape of this one.

Beach wall hanging, drying

Beach wall hanging, drying

I think the colours work well, and there’s enough detail to make it interesting without overdoing it… keeping it simple.

It is a style I will use again.

What next?

I have another piece of felt batt that I used as my ‘canvas’, so I want to make another wall hanging in a similar impressionistic style.

Not sure yet whether to do another beach scene, so I have a diptych, or a different theme altogether.

I love teal! Two nuno scarves

I love teal – well, I love all colours period.  But each time I make a new scarf using a different colour spectrum, I fall in love all over again!

I was explaining this to my hubby as I showed him the two scarves.  I was almost salivating with delight at the colours and how the two designs had turned out.  He just looked at them, looked up at me over his spectacles and said:

“It must be a girl thing.”

I was so delighted with the shining jadey-turquoisey colours that I totally ignored the potential sexist argument thing, thinking – there must be millions of people, male and female, around the world who would feel the same over two new colourful creations. Some men love colours and creating – some women can’t bear arty farty stuff. 

You can’t generalise, which is what Baz tends to do. So I brought him back to a more personalised perception of the whole thing.

“No.  It’s a me thing.”

But that’s what makes the world go around isn’t it – the differences as well as the similarities!

So, here are pics of the two teal scarves.  I made them on tissue silk, with merino rovings, lots of silk tops and a dimensional yarn.

The zigzag one may remind you of a white one I made recently, with the teal highlights and pattern.  This one is a commission for a jeweller who has a stand at the markets I attend – Glasshouse Market – we have traded our wares with each other: a scarf from me for a bracelet from her.

I love bartering.

‘Roses on Black’ nuno felt scarf

Just finished this for a customer.

It is made with black tissue silk that has black and red merino wool, red silk tops and dimensional wool felted to it.

I have to say it wasn’t the easiest scarf in the world to do.

Not because I couldn’t lay the wool fine enough, or dye the tops the right colour, or make the ‘roses’.  This time, and for the first time ever (which was bit of a blow to my ego that likes to get things right immediately), I had difficulty translating what the lady wanted and making it reality.

This is actually version two of the scarf – the first one is shown in a previous post.

My mistakes

I made two mistakes:

1. Not listening to my intuition that told me it was going to be tricky when my customer wanted me to mix two different styles of felting (this fine nuno-felt style with cobweb style).

2. Getting caught up in trying to adhere to my customer’s specific and detailed wishes and not putting in certain things – rather than listening to my intuition when I was making it, that told me to make it a certain way (which is basically how this second scarf turned out) in the first place.

Both of these mistakes feature my intuition and lack of listening to it.

When will I ever learn?

Hopefully.

On the plus side…

So, two scarves later, I now have one satisfied customer and one extra scarf to sell to another owner.

That’s the beauty of making accessories and artwork, I make something and one day the person it’s made for turns up, falls in love and takes it home.  It’s so satisfying!

The original scarf by the way, is also nice. It is more subtle with more black and less red, and with slightly more felt coverage to the tissue silk. The roses are small and have little green leaves. Here’s a photo for comparison.

black nuno scarf

I’m thinking of making a massive big, bright red felt flower and attaching it to one end.

What do you think?

Beach Wall hanging is finished!

At last, after showing you the felted first stage of my latest wall hanging, I’ve worked on it and now (apart from putting a backing onto it), it is finished and I thought I’d share a bit of the process for anyone interested.

First of all, here’s the finished wall hanging:

Moffat Beach wall hanging finished

The colours are actually brighter in real life than in this photo, and I’m very pleased how it has turned out.

I don’t know if you’ve ever had a “Can I do this?” moment, but after feeling very pleased with how my Mt. Coonowrin wall hanging turned out, I began this project with more than a little trepidation. Madame Doubt kept whispering “was the first wall hanging a one-off?”, “will I stuff up this next one?” in my ear and it took several weeks before I got up courage to begin, and lay the first tufts of blue sky.

Once it had been wet-felted though, I was happy that I have got a bit of a knack to doing this, and despite having to shave the bottom half of the project, could see in my mind’s eye how I would complete this work.

How I added detail

I needle felted a lot of detail, including fixing up shadows, adding silk noil to the sandy walkway, and grass details.  Toe make the She Oak trees look more realistic, I embroidered leaves on top of the felted leaf colour, which I think adds depth.

I didn’t like how the yarn had felted into the sea.  It had started off with a lot of blue in the variegated colours, but after wet felting, all I could see was maroon.  I spent time needle felting over these threads with various shades of blue wool and also turquoise silk tops.  Much better.

The waves were added by needle felting thin pieces of selvedge edges from tissue silk that I cut off before making scarves. By cutting off these denser edges, it ensures the wool rovings migrate right through the edge of the scarves.  Plus I get to use the selvedge edges for other projects, like the waves in this picture.  It is delicate enough to give that bubbly frothy white caps that form on the tops of waves as they approach the beach.

To finish, here’s a collage of pics, working up to the finished piece.

My next two are going to be smaller, longer thinner wall hangings – abstract in design but reflecting beach colours, and perhaps shells.

Anyway, here’s the gallery:

I would like to acknowledge Gusha Visual Media who have inspired my latest work with some of their photos of the Sunshine Coast. In particular, Moffat Beach, which is so beautiful, I wanted to try and capture the scene in felt.

Goodbye felt scarf ‘babies’

I had a lovely day at the Glasshouse Markets today: friendly atmosphere, warm company, good coffee and tasty brownies.

At the market today, I said goodbye to most of my felt scarf ‘babies’ who all went to good homes. Thank you ladies for finding the scarves that were meant for you – some of them are travelling as far as Melbourne and also New Zealand!

Another great day at Glasshouse Markets

Another great day at Glasshouse Markets

Market Stall, Art Exhibition and Auction … and Arts Trail all in October!

We’re all starting to get excited about the Glasshouse Country Festival that is being held in October.  There will be a twilight Glasshouse Market on Friday the 18th October.  Also as part of the festival, the Glasshouse Country Arts Trail that I belong to is having an art exhibition over the weekend 19th/20th October, with an art auction on the Saturday evening.

Immediately following this weekend for two weeks, the members of the Arts Trail will have our open studios, so anyone interested can come and see our work and meet the artists in person.

Felting workshop for children

I have also been asked to run a fun felting workshop for the local primary school children.

I’ve got my work cut out for me now!

NOTE TO SELF:

> Create more scarves for the twilight market stall,

> Make several more wall hangings for display at the exhibition

> Organise workshop to felt pens with the primary school kids

Real 'felt pens' drying - pens, felted with wool.

Real ‘felt pens’ drying – pens, felted with wool.

> Get some multi-vitamins!

One Day Felting Workshop – for beginners

During the first Open Studio weekend I made a small piece of felt to demonstrate the wet felting technique for four lovely ladies who had come along to Sandra Price’s studio where I was fortunate enough to show my felt art alongside her beautiful and colourful artwork.

Last week, Sandy let me know that a couple of these ladies were interested in making a nuno felt scarf, so I surprised myself by being very proactive and organised a workshop for Saturday the 3rd of August.

I have all the information at my other website, including what you receive in your Funtastic Felt Pack which you use during the workshop and which you also get to take home so you are all set to make another piece of felt if you wish.

Places are very limited, so if you would like to come along, please visit the following link  and follow the prompts.  One Day Felting Workshop

If you can’t make the 3rd August but would love to learn to make a beautiful lightweight nuno felt scarf, contact me and I’ll put you into another workshop.

Alternatively, if you and 2 or 3 friends would like to learn to make a scarf on a different date, contact me and we can work out a day that suits everyone. 🙂

Salty tales from Bali Hai on Sunday

After a break from cruising of nearly 30 years, we are sailing to the Indonesian Islands on our yacht Bali Hai

SV Acheron

A Mediterranean Odyssey

ocean-pilgrim: Life on Water

Life in the Med, on Intention

esothemes

Reflections, revelations and proposals esoteric: Themes to elucidate the depths of human potential.

BeautyBeyondBones

Because we’re all recovering from something.

Open the Door to Your Inner World

Access: Transformational Energy, Guidance, Creativity, Life Purpose

The Procrastinator Dyer's Diary

A Journal of Observations

Beesybee fiber's Blog

Life in West Marin seen through the eye of a needle

Principally felt

experiments in life, decorative felt, nuno, knit felt and mosaic

Obovate Designs™

My dabbling and exploration in contact printing, natural dyeing, and soap making

nancybrownstudio

murals, textiles, ceramics, screenprints, festivals, community

THREADBORNE

Fibre Art, Eco Printing, Natural Dyeing, Book Arts

vintage country style

my move to countryside and planning a crafts business

MarmaladeRose

... is all that matters here!

Hearts Landscapes

... is all that matters here!

Colour Cottage

little house in a field

dedepuppets

dada inspired hand puppets

The Blog of Knitted Fog

art, life and stuff